Home

Saturday, 20 December 2014

BABY in the summertime

These bad boys will be travelling with me over these summer holidays, 
some old and some new loves have been thrown into the mix this year but no doubt they'll all work their charm on me (Ill need it!!).

This year I'm going to Falls music festival in Lorne for four days over new years, which will no doubt be hot and dirty (my skin will suffer) and I am travelling to Port Elliot as I am originally from Adelaide. Both these little trips are going to be hot and long, so these products will be my loves.
I forgot to include my Kryolan setting spray which I use nearly every day and makes my make up last roughly 8 hours! As an alternative I also use my Australis 'Ready Set Go' Finishing powder (http://www.australiscosmetics.com.au/product/46109/finishing-powder) which does the trick but gives my face a slight powdery feel which is not what I want in summer, especially if you have dry skin this product will not make it look ideal (in my experience).

In summer I feel its important not to wear 'too much' make up because Its a time to let your skin breathe a bit. I definitely don't wear it to the beach but if i was just going to the shops I would just put on my maybelline dream BB cream, or my Mac BB cream, either way a very light base adding a little coverage. This is just me though, because i find my skin always improves in summer.. for some this might be the total opposite. 

A good pair of sunnies and a sweet perfume are a must. I recently picked up these amazing sunglasses from 'Le Specs' which looked exactly like a pair of Karen Walker ones I wanted but they were $400!!
I float between these sunglasses and my classic gold Ray-Ban aviators. 
My perfume picks are 'Flowerbomb' by Viktor and Rolf which you can see its pretty much empty, I really want the new Viktor and Rolf 'Bon Bon' perfume for christmas so hopefully santa is feeling generous ;) 

LIPBALMS, I love them! I am obsessed with my EOS balms currently, I have four different flavours which i picked up from COSTCO for $14 I think.. they're so good for dry lips and can always add a bit of a hydrated look to your face. Another amazing lip balm is blistex intensive repair, it is SO hydrating and fixes my lips when they are feeling split and horrible.

STAY SUN SMART! It is the most important makeup you can wear in summer! 

VICBYRNEBEAUTY XXXXX 


Wednesday, 17 December 2014

Pucker up BABE

Pucker up babe!
I am an avid Lipstick lover….as you can see.
I never realised how many lipsticks I had until I set them all out for this photo…and yet I still 'NEED more'. 
Today I'm going to talk about what lipstick shades is said to 'suit' your skin tone!

Fair

Fair skin more often than not looks amazing with more orange-based shades. Look for vibrant fruity colours that brighten your look without overdoing it!
Shades To Try:

Red: Mac-Ruby Woo, $36.00
Pink: Shanghai Suzy-Neon Guava, $12.95
Nude: Gerard Cosmetics-1995, $19.00
Dark: Gerard Cosmetics- Cherry Cordial, $19.00


Beige

Look for colours with clean undertones that aren't too gloomy so that they contrast effectively against your skin tone!

Shades To Try:

Red: Gerard Cosmetics-Fire Engine, $19.00
Pink: Shanghai Suzy-Pink Blush, $12.95
Nude: Nars, Sexual Healing, $35.00
Dark: Kit Cosmetics, Night Walker (deep plum), $24.95


Golden
To play up the honey warmth of your skin look for rich colors with warm undertones that will give you a wow factor look!

Shades to Try:

Red: Nars- 'Audacious' Annabella, $44.00
Pink: Too Faced-Fuschia, $28.00

Nude: Too Faced-Nude, $28.00
Dark: Smashbox-Vivid Violet, $26.00


Olive

To contrast with olive skin, you should look for blue undertones that give the lips a playful wash of colour.
Shades to Try:

Red: Mac-RiRi Woo, $36.00
Pink: Smashbox-Pout, $26.00
Nude: Sportsgirl-Birthday Suit, $9.95
Dark: Nars- 'Audacious' Bette, $44.00


Bronze

You can go either do nude or bold— one or the other!
Shades to Try:

Red: Nars- "Audacious' Rita, $44.00
Pink: Gerard Cosmetics-All Dolled Up, $19.00
Nude: Essence-In The Nude (Lipliner), $2.00
Dark: Gerard Cosmetics-Cherry Cordial, $19.00


Deep

Deep skin tones look great with clear reds, purples, pinks and berries as these colors stay true on darker skin tones.
Shades To Try:

Red: Sportsgirl-Bombshell, $9.95
Pink: Shanghai Suzy-Pink Blush, $12.95
Nude: Gerard Cosmetics- Buttercup, $19.00
Dark: Shanghai Suzy-Burgundy Brown, $12.95

 So thats all from me today.. Let me know what you thought of it.
I hope you all wear beautiful lipstick on Christmas Day 
xxxx

Monday, 15 December 2014

GLOWing goodness


Want to get your cheekbone glow on like those girls you see on instagram who have is mastered?….. yes I thought you might.
TODAY I introduce to you a mixture of high-end and drugstore products for all budgets and products preferences (ie. Liquid, Powder and Cream)

This trick is going to enhance your bone structure, giving a lifting appearance and a glow which catches the light and looks flawless!

My favourite THREE highlighters/ Illumiziners
1
YSL` Touche Éclat radiant touch liquid highlighter is a beautiful creamy products and is obviously one with a higher price point. I use this products to highlight/conceal under my eyes down to my cheekbones, the centre of my nose, my cupids bow, middle of chin and middle of forehead (as pictured) which also conceals under eye darkness. 
2
My newly purchased Josie Maran Argan liquid Illuminzer, Which is just WOW!
 I'm obsessed with it and its only $35 which is quite good for an amazing products thats sold at Mecca Maxima! I will either apply this products to my cheekbones or mix it in with my foundation which adds an 'instant boost of radiance and natural glow".

3
None other than 'The Balm, Mary-lou Manizer The Luminzer', you would have most likely heard of this stunner. Retailing for $34 at David Jones for those of us in Australia, and is more often than not sold out. I was lucky enough to track this down in a recent visit to Sydney where I asked the women as on the shelves they were out of stock, but 20 minutes later she called me saying she'd found 20 of them in the loading dock… THANK YOU VERY MUCH. This product is described as "a seemingly innocent honey-hued luminizer that catches everybody’s eye. This highlighter, shadow and shimmer diffuses light so your skin looks softer and younger while adding a subtle glow. "
It is so pigmented and has such a pretty glow, especially when it hits the light!
If you can get your hands on this, I would definitely say don't think twice.

I currently own eight highlighters/ Illuminizers which was news to me when I gathered them all up for this post and swatching session.. 
I have labelled them so you can see which is which! 


Please let me know of any other products you think I should invest in.

VICBYRNEBEAUTY 
XX


Sunday, 14 December 2014

"I don't even clean my makeup brushes"


I was standing at the traffic lights the other day when three teenage girls (I think about year 9 or 10) were behind me talking about makeup, naturally I was earsdropping and heard one of the girls ask "what do you wash your makeup brushes with", the other girl responded "i don't even clean my makeup brushes". I wanted to turn around and tell her how bad that was but I restrained myself…this time.

Every week I set aside some time (ideally on a sunny day), to wash all my make up brushes. It is so important to wash your brushes as they collect so much bacteria…just think, everyday you put the same brush onto your face even when you have a blemish and the  into the water as this may cause the brushes to rot or break.  from the blemish then transfers onto the make up brush. Daily you are putting this brush back onto your face.. YUK
I don't use ALL my make up brushes every week but I still think it is important to wash them all because as they sit in my glass holders they collect dust etc which isn't pleasant. 
SO HOW DO YOU WASH THEM?

DO NOT:
Fully submerged the brush handle into water as this may cause it to rot or break/split. Not idea if you have spent a decent amount on brushes.
Scrub them so hard that it looks damaging to the bristles.
Dry them with a hairdryer, this will RUIN the bristles and in some cases cause them to catch fire.

DO:
Have a good shampoo or brush cleaner on hand, such as Mac brush cleaner ($22), Napoleon Perdis brush cleaner ($40), DAISO brush cleaner ($2.80). 
I like to use a silicon patterned matt (mine was $2 from K-Mart in the cooking isle) which I put warm water and some of the shampoo/brush cleaner onto. Once all the product is on the matt I then dampen my brush' bristles under warm water and swirl around on the matt, This method is highly effective and I wish I had used a matt sooner as so much more waste (foundation, powder, eyeshadow etc) comes out of the brushes. Once washed I place protective mesh over the bristles as this keeps them in their original form. http://www.ebay.com/itm/30pcs-Cosmetic-Makeup-Brush-Pen-Guards-Cover-Mesh-Protectors-Brand-New-in-Bag-/161333003512?pt=AU_Makeup&hash=item25903244f8 
I then place my brushes in a well ventilated room, or ideally outside (not near any animals who will chew them). If placed outside the brushes will dry in an hour or so, but if inside it may take over night or longer. 

I have found that this matt from Kmart has worked wonders for my brushes as i could never get them back to their original white colour, they always looked stained with foundation. With once use of the matt it was back to white… I was so happy- How lame.
I wouldn't bother purchasing the Sigma Spa Brush Cleaning Glow which is $35 (http://www.sigmabeauty.com/Sigma_Spa_Brush_Cleaning_Glove_p/bc001.htm) you save $33! 


VICBYRNEBEAUTY

Saturday, 13 December 2014

HOW TO BROW


"If the eyes are the windows to the soul, then the eyebrows are the eye-catching curtains."
The never ending mission for prefect brows…. a first world problem, but a very important one at that. How your eyebrows are shaped can drastically improve your over all face 'look'.
Many people are mistaken about what brow shape will suit them or how heavy to fill them in.. or just avoid filling them in at all.

I have gathered a list of Face Shapes and Brow Shapes that are known to compliment each other:
Square Face ~ Softly Rounded
Round Face ~ High Arch
Long Face ~ Extended Brow
Heart-Shaped Face ~ Groomed 
Oval Face ~ Slightly Arched 

I personally used to have my brows waxed, and at that point in my life I thought it was great, but as the time went on I just plucked the re-growth myself… THEN I was introduced to 'Eyebrow Threading' and my brows lives changed forever..

For those who don't know much about it, Threading is when a thin thread is doubled, then twisted. It is then rolled over areas of undesired hair, plucking the hair at the follicle level. 
It is said to provide a more precise control in shaping eyebrows and is more gentle on the skin. I wouldnt say my experiences have been painful, it is just an odd feeling and slightly intriguing as I'm always interested as to how they are doing it! There are a few different techniques for threading. These include the hand method, mouth method and neck. Threading allows for a more defined and precise shape and can create better definition for eyebrows.
I get my brows done every two weeks at 'The Beauty Brow Parlour' in Chadstone shopping centre and it is only $10! 


I love the shape it gives my brows as it is so on point that I almost don't need to fill them in..
Definitely a must try for all ladies who are wanting to try something new!

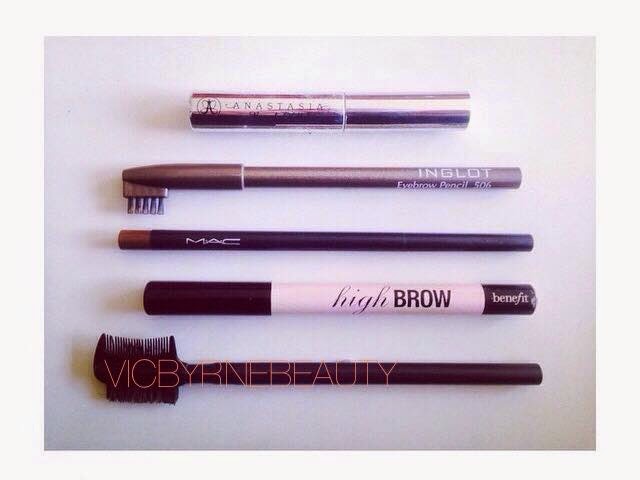
When I fill my brows in I alternate between my Mac 'Lingering' Brow Pencil and my Inglot eyebrow pencil in '506'.  Both products are quite reasonably priced but I picked up my Inglot pencil at IMATS Sydney and payed $14! For gel which will hold my brows in place all day, I use the Anastasia Beverly Hills 'Clear Brow Gel' which is a mascara shaped brush which you brush through your lashes after applying the pencils. To highlight and lift my brow bone I use Benefits 'High Brow' pencil which I lightly draw under my brows and buff. 

I have attached a video which goes in depth about threading vs waxing:
https://www.youtube.com/watch?v=YBwdu6YgHpI&spfreload=10

Friday, 12 December 2014

CONTOUR// CREAM VS POWDER?


DO YOU CONTOUR? 
Is it cream or powder? 
What do you use? 
How do you know what to do?

Contouring is the art of shading and highlighting to bring out or lessen features on the face, jaw, and bust area. 
For each specific face shape there is specific way to contour and highlight, but obviously you don't have to follow these. I personally contour under my cheekbones with my Nars Laugna bronzer or Too Faced Chocolate De solei,dusting lightly on either sides of my forehead, then on my jaw bone and under my chin which makes the jaw bone look sharper.. especially for us girls out there who think we have double chins… I feel it. 
I think highlight on top of my cheekbones, the middle of my nose, and my cupids bow with my The Balm Mary-Lou Manizer Luminizer. 
ALTHOUGH according to my 'face shape', which is round, I should only be contouring the sides of jaw and the lower sides of my face and highlighting the centre of my chin only.. This doesn't work for the look I go for when I apply my daily make up. 

Here is a list of Face shapes and how Beauty Schools teach you to contour and highlight:
(questionable in my opinion)
OVAL- Highlight about the cheekbones, Contour below the cheekbones
HEART- Highlight sides of the jaw, Contour the sides of the forehead
SQUARE- Highlight above the cheekbones, Contour the sides of forehead and the lower jaw
ROUND- Highlight the centre of the chin, Contour the sides of jaw and lower part of the face
LONG- Highlight above the cheekbones, Contour alone the hairline and chin
DIAMOND- Highlight the sizes of temples and sides of lower jaw, Contour the tip of the chin and narrow part of the forehead
PEAR- Highlight sides of forehead, Contour sides of chin and angles of lower jaw


Contouring should be done to how each individual desires it as we all have different parts of our face we want to lessen or bring out. You always need to remember to blend though, as lets be honest a straight line of bronzer underneath your cheekbone isn't going to look very natural. Blending the product in will soften the effect but create a more natural finish.

SO,
POWDER OR CREAM?
In general, powders are easiest to blend, creams are highest coverage, and liquids have the highest staying power.
In my experience it is easier to use a powder product, but for certain occasions it works well to use a cream. I am yet to own an liquid contour products if anyone could suggest any in the comments below.


HELPFUL CONTOURING AND HIGHLIGHTING VIDEOS:

CARLI BYBEL:

JACLYN HILL:

NICOLE GUERRIERO:

GLAMBOOTH:


VICBYRNEBEAUTY